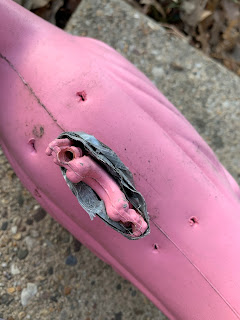
This flamingo planter will be part of our Petal Porch decoration (see more about that event here). I recycled an old yard flamingo from my collection as I could not bring myself to sacrifice a new one.
WARNING! This craft is fairly easy to make, but due to the SHARP plastic edges and use of a knife, I would not recommend this for children and advise that you use extreme caution when working on it yourself.
WARNING! This craft is fairly easy to make, but due to the SHARP plastic edges and use of a knife, I would not recommend this for children and advise that you use extreme caution when working on it yourself.
Level: moderate Cost: inexpensive Use: gift/decorative
Materials:
- Plant
Step 1: Put on leather gloves and clamp flamingo tightly in a vise so that it does not slip. Take out the metal legs.
Step 2: Puncture the bottom of the flamingo to make 3-4 holes for drainage.
Step 3: Turn it over and cut a slip in the middle of the back. Then cut a square around that slit. Bending in the two long sides to create an opening of about 4 inches long and 3 inches wide. (Go bigger if your plant is larger.)
Step 4: Fill the inside of the flamingo with potting mix.
Step 5: Place your plant in the potting mix and fill in soil around it.
Step 6: Water and let drain.
Step 7: Replace the metal legs and place the flamingo in your garden.
- Depending on the plant you pick, you may need to water it frequently.
- You may also want to change out the plant seasonally or as the flowers fade. In this demonstration I used a clump of crocus bulbs from my garden. Once those blossoms drop, I will switch out to pansies for spring, then petunias for summer.
- You can paint and decorate your flamingo as well. See our Flamingo Makeover project too.
This post contains affiliate links, which means that if you click on one of the product links, I’ll receive a few pennies from Amazon.
This is a monthly blog series on DIY projects for the beginning home gardener. Look for the other installments in this DIY blog series by putting "DIY" in the search box here at washingtongardener.blogspot.
Pin This For Later!


No comments:
Post a Comment