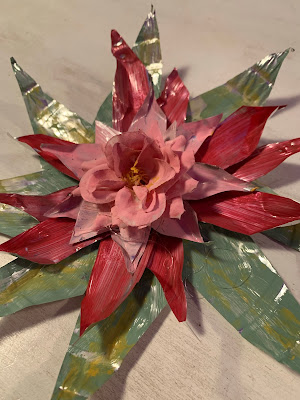
This metal flower idea came to me as a way to make inexpensive floral wall art. I plan on making several in different sizes to create a mural. I chose a waterlily shape and design for this one. You could adapt the petal shapes to be more rounded and make the flower into a rose or peony as you wish.
This craft is fairly easy to make, but due to the SHARP edges of the metal pieces I would not recommend this for children.
Level: moderate Cost: inexpensive Use: gift/decorative
Materials:
- Hot Glue Gun (or marine glue)
- Center stamen piece*
Step 2: Cut out a bottom leaf base design.
Step 3: Cut out petal shapes. The shapes should be narrowed, tapered, or rounded off on each end. Make a minimum of 7-9 for the first layer that are about 6-8 inches long, then 5-7 for the middle layer that are about 4-6 inches long, and finally, cut 3-5 for the top layer that are shorter still.
Step 4: Paint the leaf base green and the petal shapes. I did a green base with a yellow wash on the leaf base. I painted the largest petals red, the medium ones a straight pink, and the smallest ones a pale pink.
Step 5: Glue the petals onto the leaf base starting with the largest layer to the smallest, Be sure to alternate them to mimic how flower petals grow.
Step 6: Glue in the center stamens*
Step 7: Pinch the ends of each leaves to curve up and look more natural.
*I used an old silk flower that I painted. You could use a bottle cap, a piece of costume jewelry, or anything you think would work.
- If you want this to last longer or be displayed outdoors, spray it with a clear sealant.
- For outdoor use, glue it together with marine glue or gorilla glue and wait longer between layers for the glue to cure.
- Glue a magnet or hanger on the back to display your flower. You can also just set it on top of a stack of books or tie it onto a gift package.
- Your color scheme can be anything you like. I like the look of a layered effect, but you could make all the petals the same or each layer totally different.
This post contains affiliate links, which means that if you click on one of the product links, I’ll receive a few pennies from Amazon.
This is a monthly blog series on DIY projects for the beginning home gardener. Look for the other installments in this DIY blog series by putting "DIY" in the search box here at washingtongardener.blogspot.
Pin This For Later!


No comments:
Post a Comment