Showing posts with label diy. Show all posts

Saturday, May 01, 2021

DIY: Strawberry Rocks

These little strawberry rocks are meant to fool creatures that attack your berries just as they start to ripen. The theory being that birds and squirrels try to bite into the "ripe strawberry" and find it rock-hard and then move on.

I don't want to net my strawberry bed for fear a bird or other creature will get caught in the netting and die. So, when I heard of this option, I thought it was worth a try. Whether they work or not, we shall see. If nothing else, they are cute and add to the garden decor.

Level: easy   Cost: inexpensive   Use: garden


Materials:
- a few small rocks


Step 1:
Select a few small stones that are approximately strawberry-sized and shaped. Then, clean and dry your rocks.
Step 2: Pain a base coat of red paint. Let dry thoroughly, Then paint a second coat. Let that dry too. Then decide whether you may need a third coat or not.
Step 3: Paint the stem and leaves on with green paint. (I only needed one coat on the green parts, you might need a second one.) 
Step 4: Use a marker to dot on the "seeds."
Step 5: Apply a sealant. I used a clear nail polish base coat as I wanted my rocks to be really shiny.
Step 6: Place your rocks in and among your strawberry plants right before your berries start to ripen.
Step 7: You can leave them out all year or store them after the berry season is done. They may need an annual paint touch-up.
Decoys in place!

This post contains affiliate links, which means that if you click on one of the product links, I’ll receive a few pennies from Amazon.
This is a monthly blog series on DIY projects for the beginning home gardener. Look for the other installments in this DIY blog series by putting "DIY" in the search box here at washingtongardener.blogspot.com

Pin This For Later!

Thursday, April 01, 2021

DIY: Violet Syrup

Early spring is the perfect time to get out and forage for edible flowers. Wild Violets are easy to identify and collect. (See more about growing Wild Violets here.)  You can eat both their flowers and foliage. For the purposes of this recipe, collect just the flowers.

The taste of these Wild Violet syrup is like a light grape juice. It can be used as a flavor syrup in a SodaStream or as a flavoring for a cocktail or mocktail. You can also use it in baking recipes that call for light simple syrups.

It can take a few hours to collect enough of these tiny violets to make a whole cup, so if you can get a 1/4 up or 1/2 cup just adjust the recipe proportions accordingly. Basically, it is one part violets to one part water to one part sugar.


Level: easy   Cost: inexpensive   Use: edible/gift


Materials:
- 1 cup Wild Violet flowers

- 1 cup+ water

- 1 cup sugar

- a few drops of lemon juice

- food coloring (optional)

- a glass jar with lid


Step 1: 
Collect the wild violets. Look for them off the beaten path and not in areas where dogs do their business and chemicals are sprayed.
Step 2: Select a large glass jar with a lid. (I cleaned out an old pickle jar.) Place the violets inside and pour in 1 cup of boiling water. Let sit out on a counter overnight to steep.
Step 3: The next day, shake it up and scoop or strain out the violets. Press the violets against the lid or strainer to extract further juice and flavor from them. Discard the used violets in your compost.
Step 4: Add a cup of sugar and then more hot water up to just below the top of the jar. Close the lid tightly and shake it vigorously to blend in the sugar.
Step 5: The syrup is done, but will not look purple. To get the nice lavender color, add a few drops of lemon juice.
Step 6: I wanted a deeper purple color, so I added a few drops of red and blue food coloring and stirred it up.
Step 7: Allow to cool and then label it. Use it in drink and baking recipes as desired. Store in the refrigerator.


Tips and Care:
  • This same recipe can be followed to make a flavor syrup from other edible flowers such as roses or lilacs.
  • It can store for up to two weeks in the refrigerator.
  • This syrup has health benefits such as being high in vitamin C and A.
  • You can pour some into little bottles and tie a ribbon on each to give them out as a pretty gift.
  • If you use an alternative sweetener, like honey or brown sugar this will effect the color and it may not look as clear or deep purple.

This post contains affiliate links, which means that if you click on one of the product links, I’ll receive a few pennies from Amazon.
This is a monthly blog series on DIY projects for the beginning home gardener. Look for the other installments in this DIY blog series by putting "DIY" in the search box here at washingtongardener.blogspot.com

Pin This For Later!


Monday, March 01, 2021

DIY: Flamingo Planter


This flamingo planter will be part of our Petal Porch decoration (see more about that event here). I recycled an old yard flamingo from my collection as I could not bring myself to sacrifice a new one.

WARNING! This craft is fairly easy to make, but due to the
 SHARP plastic edges and use of a knife, I would not recommend this for children and advise that you use extreme caution when working on it yourself.

Level: moderate   Cost: inexpensive   Use: gift/decorative 


Materials:


Step 1: 
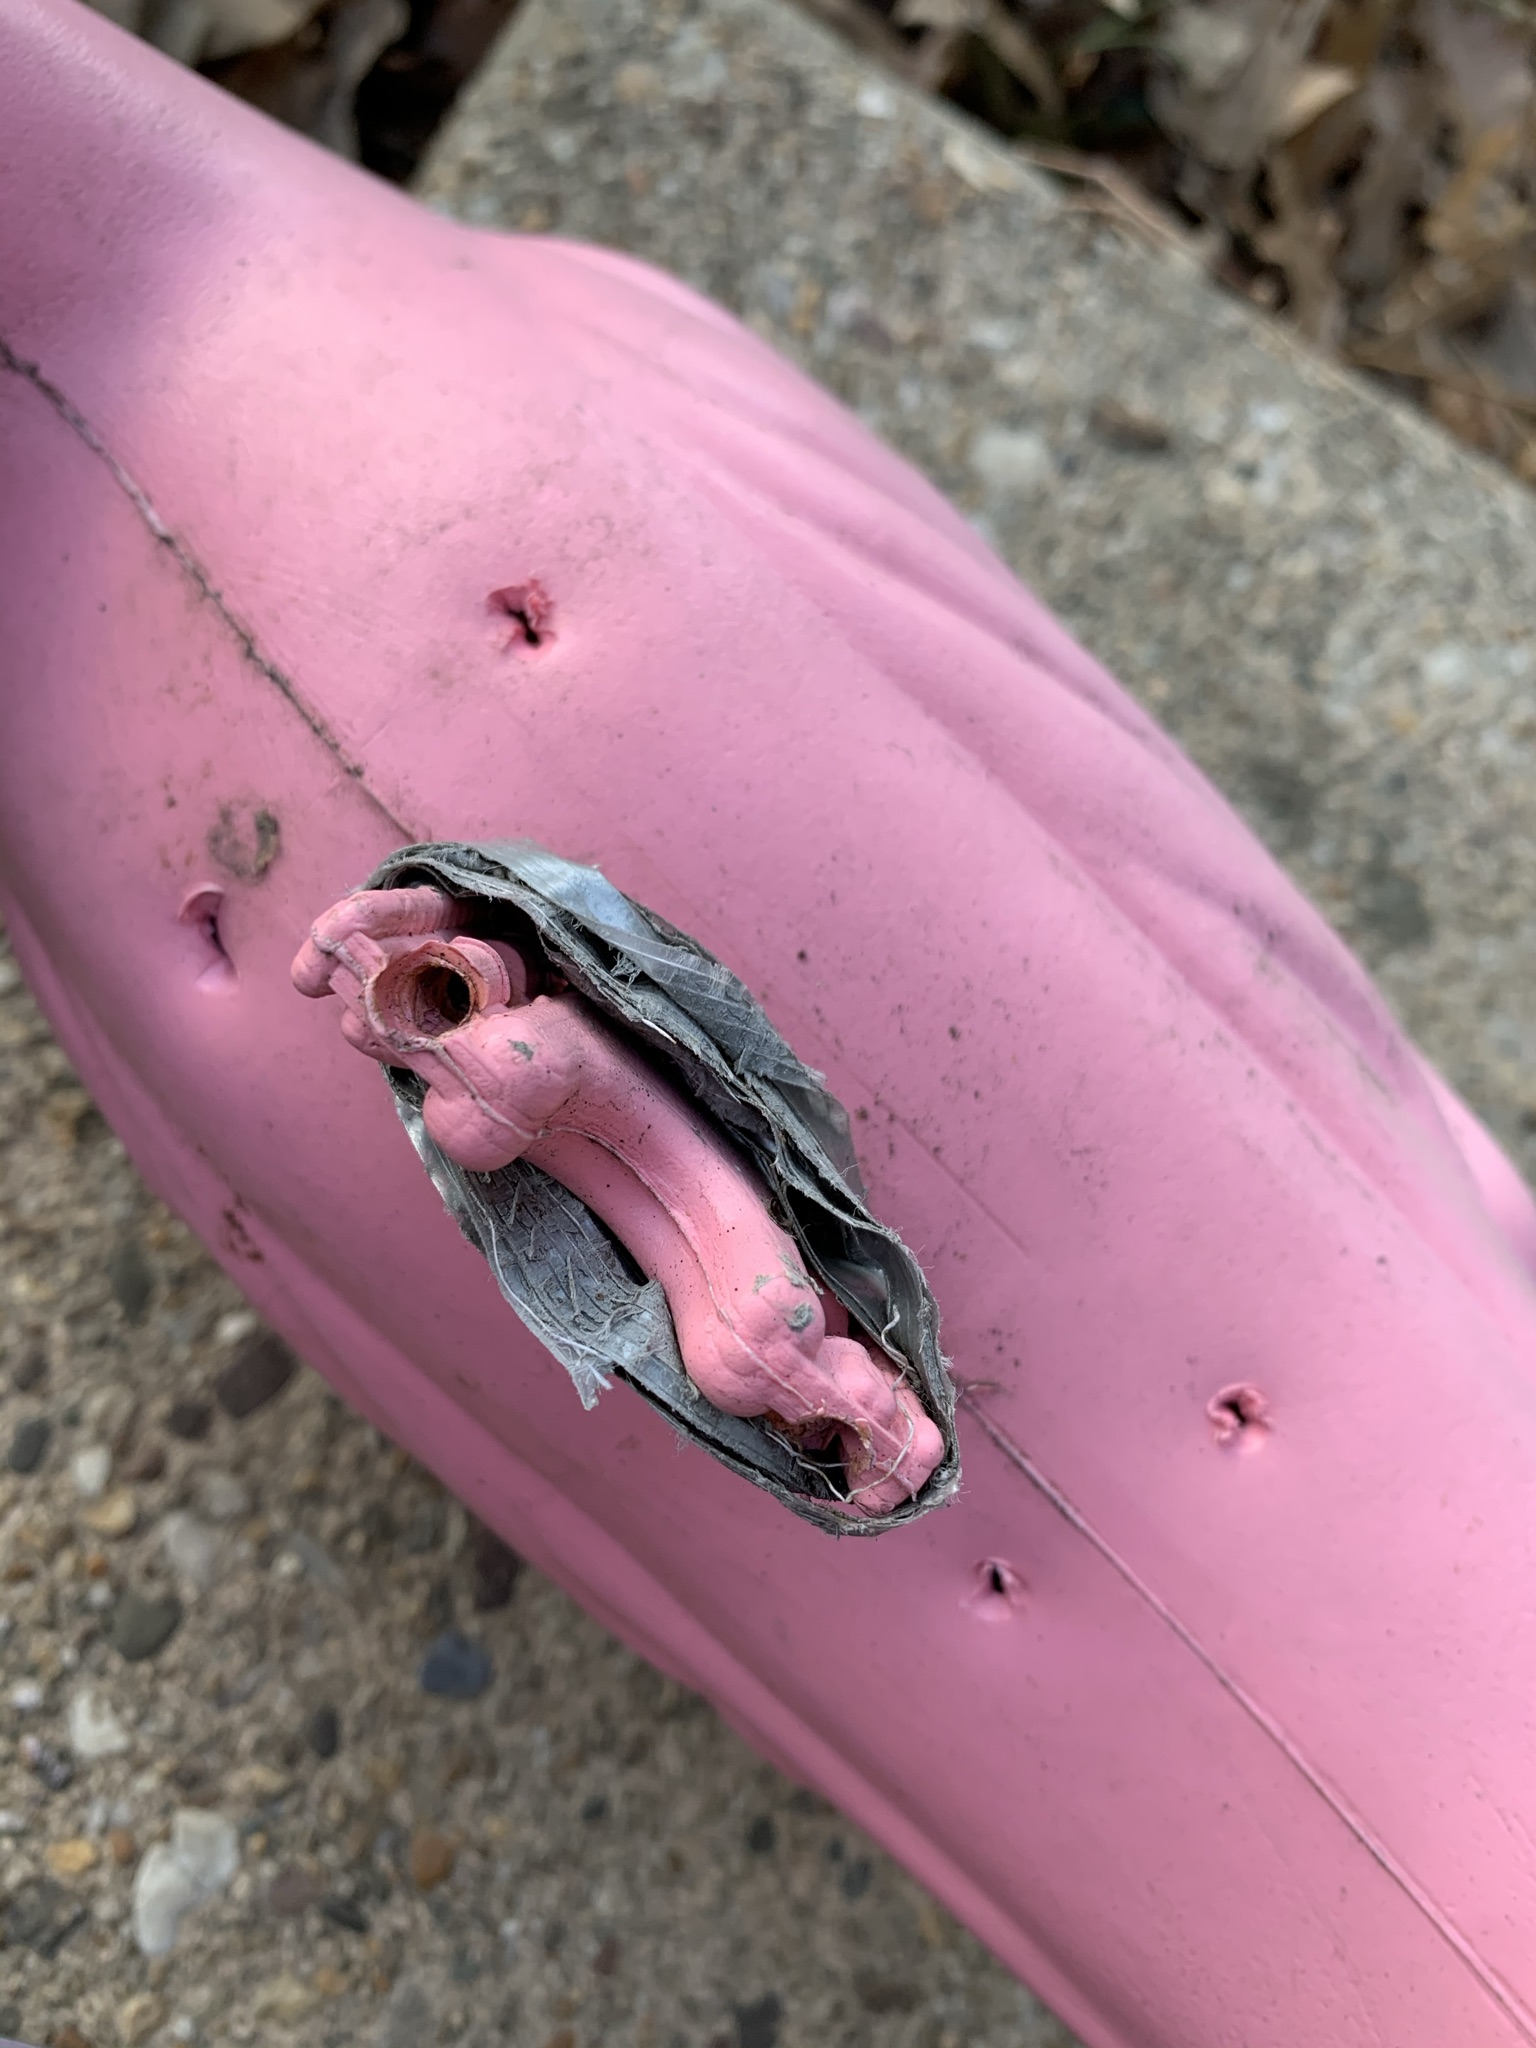
Put on leather gloves and clamp flamingo tightly in a vise so that it does not slip. Take out the metal legs.
Step 2: Puncture the bottom of the flamingo to make 3-4 holes for drainage.
Step 3: Turn it over and cut a slip in the middle of the back. Then cut a square around that slit. Bending in the two long sides to create an opening of about 4 inches long and 3 inches wide. (Go bigger if your plant is larger.)
Step 4: Fill the inside of the flamingo with potting mix.
Step 5: Place your plant in the potting mix and fill in soil around it. 
Step 6: Water and let drain.
Step 7: Replace the metal legs and place the flamingo in your garden.


Tips and Care:
  • Depending on the plant you pick, you may need to water it frequently.
  • You may also want to change out the plant seasonally or as the flowers fade. In this demonstration I used a clump of crocus bulbs from my garden. Once those blossoms drop, I will switch out to pansies for spring, then petunias for summer.
  • You can paint and decorate your flamingo as well. See our Flamingo Makeover project too.

This post contains affiliate links, which means that if you click on one of the product links, I’ll receive a few pennies from Amazon.
This is a monthly blog series on DIY projects for the beginning home gardener. Look for the other installments in this DIY blog series by putting "DIY" in the search box here at washingtongardener.blogspot.com

Pin This For Later!


Monday, February 01, 2021

DIY: Metal Flower


This metal flower idea came to me as a way to make inexpensive floral wall art. I plan on making several in different sizes to create a mural. I chose a waterlily shape and design for this one. You could adapt the petal shapes to be more rounded and make the flower into a rose or peony as you wish.

This craft is fairly easy to make, but due to the SHARP edges of the metal pieces I would not recommend this for children.

Level: moderate   Cost: inexpensive   Use: gift/decorative 


Materials:
- Center stamen piece*


Step 1:
Flatten your tins and cut off the edge/side areas.
Step 2: Cut out a bottom leaf base design.
Step 3: Cut out petal shapes. The shapes should be narrowed, tapered, or rounded off on each end. Make a minimum of 7-9 for the first layer that are about 6-8 inches long, then 5-7 for the middle layer that are about 4-6 inches long, and finally, cut 3-5 for the top layer that are shorter still.
Step 4: Paint the leaf base green and the petal shapes. I did a green base with a yellow wash on the leaf base. I painted the largest petals red, the medium ones a straight pink, and the smallest ones a pale pink.
Step 5: Glue the petals onto the leaf base starting with the largest layer to the smallest, Be sure to alternate them to mimic how flower petals grow.
Step 6: Glue in the center stamens*
Step 7: Pinch the ends of each leaves to curve up and look more natural.
*I used an old silk flower that I painted. You could use a bottle cap, a piece of costume jewelry, or anything you think would work. 


Tips and Care:
  • If you want this to last longer or be displayed outdoors, spray it with a clear sealant.
  • For outdoor use, glue it together with marine glue or gorilla glue and wait longer between layers for the glue to cure.
  • Glue a magnet or hanger on the back to display your flower. You can also just set it on top of a stack of books or tie it onto a gift package.
  • Your color scheme can be anything you like. I like the look of a layered effect, but you could make all the petals the same or each layer totally different. 
This post contains affiliate links, which means that if you click on one of the product links, I’ll receive a few pennies from Amazon.
This is a monthly blog series on DIY projects for the beginning home gardener. Look for the other installments in this DIY blog series by putting "DIY" in the search box here at washingtongardener.blogspot.com

Pin This For Later!

Tuesday, December 01, 2020

DIY: Lemongrass Tea Wreath


This super-easy craft makes a nice gift for the tea-lover on your list or for yourself. Lemongrass leaves are long and unwieldy and rolling them into a small wreath allows you to more easily store them and add them into a cup to brew.

Level: easy   Cost: inexpensive   Use: gift/edible 


Materials:
Lemongrass plant

Step 1: 
Select a lemongrass blade that is about 3 feet long. (You can use more than one blade, if you are making wreaths to add to a soup or other dish for stronger flavoring.)
Step 2: Form the end of the blade into a circle around three fingers, then pull the other end through to make a loose circle.
Step 3: Start wrapping the long end around the circle -- twisting it as you go. 
Step 4: Tuck in the last of the loose end or trim it off.
Step 5: Drop one wreath into a cup of boiling hot water to steep for a couple minutes. Remove the wreath and stir in a teaspoon of local honey. Drink.

Tips and Care:
  • In the August 2018 issue of Washington Gardener Magazine, we share tips for growing, propagating, and preserving Lemongrass. 
  • Fresh lemongrass works best as it can get a bit scratchy and rough as it dries. If the blade is too rough or hard to work with, peel off the stiff section.
  • Make several small wreaths to place on holiday gifts or in stockings.
  • You can dry the wreaths by hanging them for a few weeks in a well-ventilated room or place them in a dehydrator for several hours.
  • Store them in a glass jar.
This post contains affiliate links, which means that if you click on one of the product links, I’ll receive a few pennies from Amazon.
This is a monthly blog series on DIY projects for the beginning home gardener. Look for the other installments in this DIY blog series by putting "DIY" in the search box here at washingtongardener.blogspot.com

Pin This For Later!


Sunday, November 01, 2020

DIY: Succulent Book Planter


This craft is an ideal convergence of two of my favorite pastimes -- gardening and reading. It came out so well, that I am thinking of making more for holiday gifts. I have many friends who share my plant and book obsessions -- it will be fun to match a vintage title with their interests.
For this project, I sorted through a box of old volumes in my attic recently and chose a book that I thought would be a good candidate for this craft. It was a hardback sci-fi tale with a few torn pages and a missing book jacket.
For some people, using a book may seem like heresy, but as someone who has volunteered at a library book store for years and has seen how many books go in the incinerator or are "remaindered" in a dumpster because they are not in sellable shape, I can attest that being re-made as art or decor is a much better fate for a slightly damaged book. If you have a book in less-than-perfect shape, you might consider this, rather than trying to donate it knowing it will likely get destroyed if it is not in close to perfect condition.

Level: easy   Cost: inexpensive   Use: gardening/decor 


Materials:


Step 1: Open up the book to about 10 pages in and crease it open. Put a heavy weight on the open book to keep it open. (I used a large ceramic pot.) Then spread Mod Podge using a foam brush liberally around the ends of the pages that you will be cutting a hole into later. Let it drive overnight. (I did a second layer of Mod Podge to be super-secure.)

Step 2: 
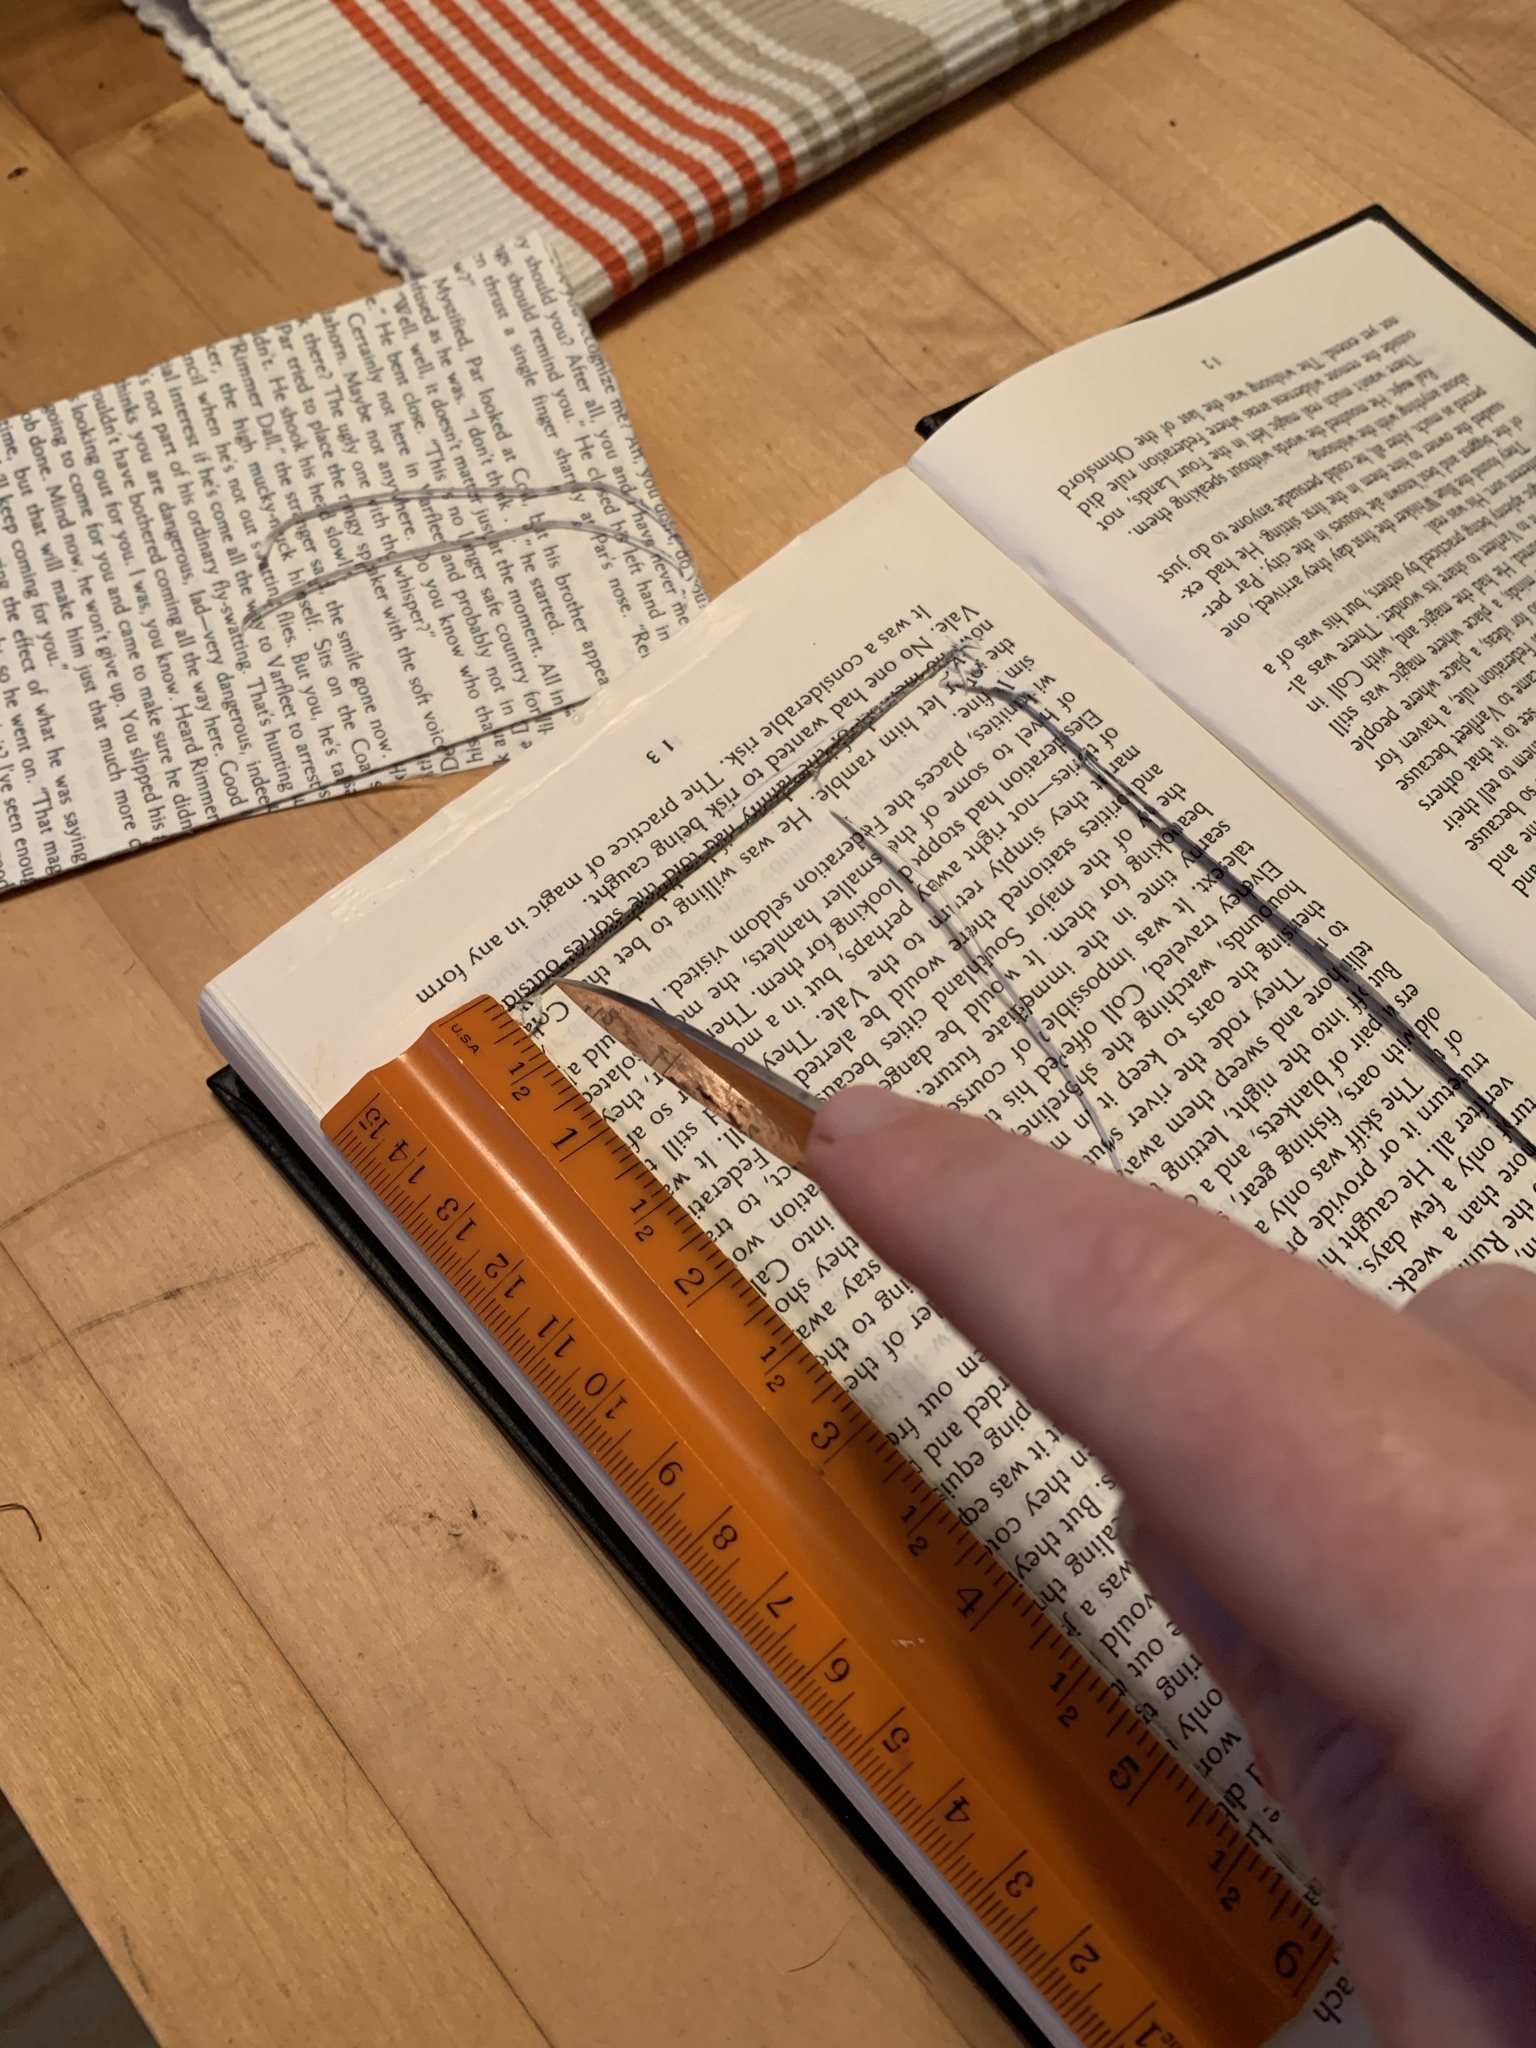
Measure in an inch from the page edges with a ruler and then begin cutting out the inner part of the page to create your planting hole. This is the longest and most tedious part of the process. To get through 150+ pages it took me a few hours total. I rested my hands and wrists when they started to get tired. I did it over a few days --working for about a half-hour at a time. Switch out the blade on your knife for a new one when the old one gets dull. The page cuts don't have to be perfect as you are lining and they will be hidden. Be careful not to rush or get distracted, so you don't cut yourself!
Step 3: Once you have excavated your planting hole. Line it with a plastic bag. 

Step 4:
Scoop some potting mix into the plastic lining and then plant your succulents inside it. Arranges as you like.
Step 5: Trim off any plastic sticking out around the planting hole's edges.
Step 6: Place decorative pebbles around the succulents and covering any bare potting mix. You can also use Spanish moss or aquarium gravel for this.

Tips and Care:
  • Choose succulent plants that are small and shallow rooted. Once they grow larger, you may want to pull them out and replace them with new, smaller selections.
  • About once a week, sprinkle the succulents with a bit of water. Try not to water the surrounding book pages. 
  • Display the finished book planter on a stack of books on a side table in a sunny space.
  • Some people cut out the hardback cover and plant through that. This results in plantings coming out of the front of a closed book, but I personally like the look of an open book myself.
This post contains affiliate links, which means that if you click on one of the product links, I’ll receive a few pennies from Amazon.
This is a monthly blog series on DIY projects for the beginning home gardener. Look for the other installments in this DIY blog series by putting "DIY" in the search box here at washingtongardener.blogspot.com

Pin This For Later!

Thursday, October 01, 2020

DIY: Pumpkin Succulent Arrangement


I love Halloween! Sometimes though, I don't feel like going to all the trouble and mess of cleaning out and carving a pumpkin. This year, I thought I'd try creating a succulent-topped pumpkin. You can use this for fall displays both indoors and out and keep it through Thanksgiving for a table centerpiece. 
Note that the project is easy, but I would not recommend it for small children as the hot glue gun can cause minor burns.

Level: easy   Cost: inexpensive   Use: gardening/holiday decor 


Materials:
- pumpkin


Step 1:
Gather your supplies and plug in your hot glue gun. Make sure your pumpkin is clean and dry.
Step 2: Break/cut the stem off the top of the pumpkin and then drizzle a circle of hot glue around the stem area. Working quickly, press the moss down on the hot glue. Be careful not to directly touch the glue yourself.
Step 3: Trim branches off the succulent plants and strip the lower leaves off. Starting with the larger succulents first, then work to fill in around them. Place them around the moss area first before gluing them in to see the effect. Re-arrange as desired. 
Step 4: Finally, glue down each succulent into the moss layer. You can then evaluate and fill in any bare spots you might see. Be sure to step back occasionally to look at the arrangement from above and all angles for balance and even distribution.
You can also watch a quick video how-to of this project on TikTok.


Tips and Care:
  • The trimmed-off lower leaves from the succulent plants can be use to propagate more plants by laying them on top of slightly-moistened soil in a small spot placed in a sunny window.
  • After you are done displaying the pumpkin, you can carefully peal off the succulent cuttings and stick them in soil. Not all will successfully root, but many should.
  • The pumpkin can be broken down afterwards for its seeds and flesh for making pies, puree, etc. or you can just compost it.
This post contains affiliate links, which means that if you click on one of the product links, I’ll receive a few pennies from Amazon.
This is a monthly blog series on DIY projects for the beginning home gardener. Look for the other installments in this DIY blog series by putting "DIY" in the search box here at washingtongardener.blogspot.com

Pin This For Later!


Tuesday, September 01, 2020

DIY: Teacup Garden

I love miniature gardens and having been meaning to do this project for a long time with an antique teacup with a broken handle. This project came together quickly and was a lot of fun. I'd recommend it for a small garden club or to do with children at least 10 years old. 

Level: easy   Cost: inexpensive   Use: gardening decor 


Materials:
- miniature yard flamingos or any accessories you choose

Step 1: 
I borrowed a friend's cordless rotary took (Dremel) drill with a ceramic drill bit to make a drainage hole in the bottom of the teacup. Wear safety goggles, gloves, and work over an old piece of board outside in case you punch through. Go slowly and do a little at a time so you don't shatter the cup.
Step 2: I then filled the cup with potting mix and thoroughly watered it in.
Step 3: I next planted little succulent plants I gathered from around my garden and even added in a tiny Black-eye susan seedlings that was coming up between some path pavers.
Step 4: Finally, I added the two miniature yard flamingos and set the teacup on a table inside my gazebo where it can spend the rest of the growing season. 
Tips and Care:
  • The saucer need not match the cup. If you have mismatched sets of old chipped china, it is even more fun.
  • You can decorate a little landscape around the base of the cup inside the saucer or leave it plain.
  • This will need occasional watering, but don't leave it out in the rain or over-water it.
  • All of the plants are winter hardy, but I still may bring it in to enjoy on a windowsill this winter and swap out the plantings as needed.
  • Get creative with your miniature accessories. I happen to love yard flamingos, but if that isn't your thing, try mini mushrooms, a tiny birdbath, or whatever you desire!
This post contains affiliate links, which means that if you click on one of the product links, I’ll receive a few pennies from Amazon.
This is a monthly blog series on DIY projects for the beginning home gardener. Look for the other installments in this DIY blog series by putting "DIY" in the search box here at washingtongardener.blogspot.com

Pin This For Later!


Featured Post

Holiday Gifts for Gardeners ~ Top Gardening Gifts ~ 21+ Cool Gardening Gift Ideas

The holiday season is here and I bet you have a gardener on your gift list, so we've   updated   our annual a Holiday Gifts for Gardener...

Most Popular Posts